There is enough to account for in our day-to-day business that we don’t add anything lightly. Ergo, we can’t say with certainty what question we get asked most often. If we had a count, however, very near the top would be: “How do I shoot more accurately without slowing waaaaay down?”
The tone is usually not an out-and-out whine, mind you—these are adults, after all—but it’s close. To call it “plaintive” would certainly be fair. And we intend no mockery here: This is a good thing to take seriously. Indeed, after “never let the muzzle cover anything you’re not willing to destroy,” it’s probably the best thing to take seriously.Two schools of thought on what comes next: Where, precisely, do you aim?
That it’s also seriously elusive gets us back to the “tone”—business. It is not an easy thing to do well, and particularly with a handgun.
Fixing the problem, however, is the stuff of some consequential lifetimes, and the contents of many a book. Today, we’ll settle with suggesting an exercise. It’s by no means new, but very, very sure, and it builds the single most oft-forgotten characteristic of the classic “good shot”: Confidence.
We begin with an assumption that the basics are in order. Sight picture and trigger press are “gotta-haves,” for instance, and they are certainly helped by having grip (here, especially here and here), stance (here and here) and draw (here and here) in good shape. But don’t wait to work on your accuracy: Many old-timey instructors didn’t move on until this was well-established, and they weren’t wrong. Nowadays we tend to want to get to the fun stuff—which isn’t wrong either—but it’s better to think of the component skills as being a “rising tide that lifts all boats,” rather than a hierarchical list. Accuracy is more rewarding in the long run, but you can mix in safe, legitimate fun early on, too. We think this drill fits both bills.
Our exercise has simple requirements—an unmarked shooting background/surface roughly a foot square with a small, centered aiming point. Many folks print their own with a roughly one-inch (but no larger) dot in the center of an 8.5 x 11” sheet of paper; this is a sensible economy as you’re likely to need quite a few. You’ll want to post this on a firm backer.
Post this target at a distance of 8-10 feet from your shooting position. This distance accounts for a couple feet of outstretched arms, yet keeps your target from getting beat up too rapidly by muzzle blast.
In the early stages of the exercise, we suggest you abandon your draw and start from low ready. From there on out, it’s a basic slow fire drill. Two schools of thought on what comes next: Where, precisely, do you aim? We’re of the “six o’clock” hold camp—with the front sight post centered in the rear notch and tops of front and rear even/level, we “float” the target dot just above the front sight post. (Six o’clock hold has the advantage of allowing the shooter to see more of his/her target and uses sight dimensions to place bullet strike above the actual geometric line of aim. The theoretical disadvantage is that you are not actually aiming at precisely where you intend for the bullet to strike.)
The alternative is “center-” or “dead-” hold, where you halve the target dot with the top of the sight post. This hold is technically more “accurate” in the sense that it presents a sight picture more closely matched to the bullet impact point. Because neither method changes the ballistic path of the bullet (only how that path is directed), which you choose is a matter of taste, and both will yield superb results with practice.
The crucial point is to commit to one hold or the other, and repeat it with as much precision as you can muster. Take seven to 10 shots at a reasonable pace, then check your target. (“Reasonable” is no more than about three seconds apart.) Break it into two strings if you feel yourself tiring at all. Don’t attempt to “chase” hits to make groups smaller: Keep your sight picture as identical as you possibly can without slowing successive shots. No more than ten rounds on a single aiming point/target.
That’s all there is to it.
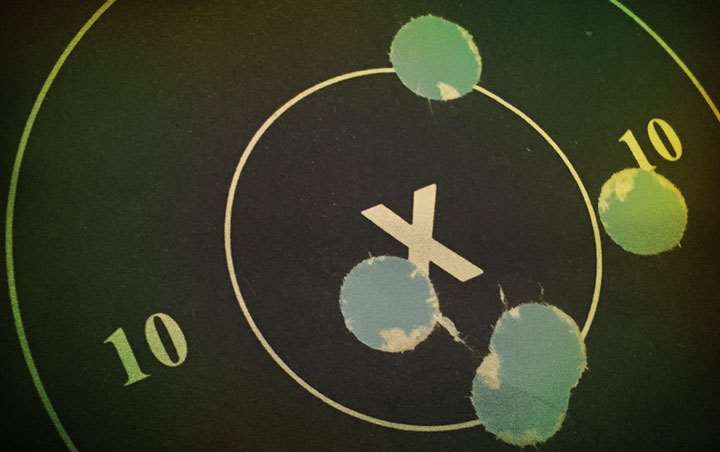
What you’re likely to discover is even at this distance, you’re spreading shots out. If they don’t all touch—and, ideally, they should not just touch, but be one ragged hole—you’ve discovered the reason your more distant attempts are disappointing.
Until the one-ragged-hole result is routine—say four out of five attempts—you know that some aspect of your fundamentals are letting you down. Doing this well is all about consistent sight picture and trigger press. And, at short distances or long, this is about 90 percent of shooting well with any firearm, but especially crucial with a handgun. If we can say so without patronizing, it may help to revisit those links we provided.
A few practical considerations remain if you decide to make this drill part of your practice routine. For openers, don’t slow down too much between shots. This can introduce some oddities that are a little beyond our scope for the moment, but suffice it to say that’s part of the drill—recovery to an accurate follow-up shot sight picture, should it be needed or desired.
Be aware for which “hold” your sights are actually dimensioned. As a general rule, “defensive” or “tactical” sights (those with tritium inserts, for instance) are optimized for center hold, “competition” sights for six o’clock. Adjustables, naturally, can be set up for either. Should all your pistols be the same? Logic says “yes,” but our experience downgrades this. As you gain real command of sight picture and trigger press, you’ll discover the point of aim/impact differences are very small at defensive distances.
Setting your targets this close requires some care too, indoors, or out. If you set them at eye-level (only natural), you may find yourself shooting into the ceiling indoors, or over the berm outdoors. That’s not, repeat not, good. Post lower to stay safe, or, outdoors, move your target right up to the berm.Some folks are tempted to write this off as simply a variation of the notion of “aim small, miss small” philosophy, but we would argue it isn’t quite that simple.
If you discover this helps a bunch, you may want a next step. It’s a great plan, but keep that aiming dot a similar proportion as you move it out: Enlarge it as distance increases. This isn’t a visual acuity test, after all. A good guideline is “just wider than your front sight,” as this allows for precise (but not labored) positioning of the dot with either hold type.
We don’t recommend multiple dots on the same surface unless quite widely separated. Public ranges with interval posting of targets may necessitate multiple aim point set-ups, however, and here butcher paper and stick-on dots (of a single color—no pattern) are the only real option. While it’s somewhat subjective, we’re adamant about this: Do not use patterned dots or bull’s-eyes for this drill. We rarely see as good, or as rapid, results when this pattern is broken. We suspect it’s a neuro-optical “clutter” effect of some sort, but wouldn’t remotely claim the expertise to say definitively. Just that experience thing …
Some folks are tempted to write this off as simply a variation of the notion of “aim small, miss small” philosophy, but we would argue it isn’t quite that simple. “Aiming small” presumes some things about targets in the real world that aren’t always true—that there is something small enough and visually defined enough to make that model work. Also, it implies that there’s time for the detailed scrutiny. Other inputs may definitively identify a target without making a precise aim point apparent, though of course responsibility for identifying what you shoot at is still 100 percent on you.
Lastly, we’ve said nothing about actual point-of-impact relative to our aiming point. Mainly, this is because such a “problem” takes care of itself if you stick with the drill. Center hold produces the sought-after “ragged hole” in the bottom half of the circle, and six o’clock slightly lower. As repeatability “happens,” all this reflects are the small parallax differences in line-of-sight/point-of-aim because of the offset between the barrel and the aligned sights. Remember that this works in your favor at realistic handgun ranges: Your bullet is rising as it leaves your barrel, and traveling through a ballistic arc of considerable precision that matches sight alignment within about a half-inch until you get to at least 25 yards. Letting this happen without adding your own effects has another name, and one you know: accuracy.
More than any single thing, this drill zaps excuses: What works at eight feet will work at 100 or more. And there’s another name for that, too: confidence.